Deploy a Full Stack App on AWS EC2
Deploy a full stack app on AWS EC2 with Nginx, Node.js, PM2, SSL, DNS, security groups, and a production-ready setup.
If your full stack app works locally but breaks the moment you try to put it online, the problem is usually not your code. It is the deployment chain: EC2 setup, security groups, Node.js process management, Nginx reverse proxy, environment variables, SSL, and DNS all need to work together.
The short answer: to deploy a full stack app on AWS EC2, launch an Ubuntu EC2 instance, open only the required ports, SSH into the server, install Node.js, Git, Nginx, and PM2, clone your frontend and backend code, build the frontend, run the backend with PM2, reverse proxy traffic through Nginx, connect your domain, and secure everything with HTTPS. This guide uses a practical React/Vite/Next-style frontend with a Node.js/Express API, but the same structure works for most MERN, PERN, and full stack JavaScript apps.
Why Full Stack App Deployment on EC2 Breaks
Full stack app deployment on EC2 usually breaks because local development hides production problems. On your laptop, the frontend, backend, database, ports, environment variables, and localhost URLs all work in a forgiving environment. On EC2, every one of those assumptions becomes explicit.
Amazon EC2 gives you a virtual server in AWS, but it does not automatically configure your app runtime, firewall, SSL, process manager, reverse proxy, or deployment workflow. AWS describes EC2 as a service for secure, resizable compute capacity in the cloud, which means you get control, but you also get responsibility for the server layer. AWS EC2 documentation is clear that instances, security groups, key pairs, storage, and networking are separate parts of the setup.
The most common failure pattern is simple. A developer runs the backend on port 5000, the frontend on port 5173 or 3000, and the app works locally. Then they push it to EC2 and open the public IP in a browser. The frontend loads, but API requests fail because the code still calls http://localhost:5000. In production, localhost means the user’s browser, not your EC2 backend.
A second common issue is security group misconfiguration. AWS security groups act like virtual firewalls for EC2 instances. If port 22 is blocked, SSH fails. If port 80 is blocked, HTTP fails. If port 443 is blocked, HTTPS fails. AWS also documents that security group rules control inbound and outbound traffic at the instance level, so an app can be running perfectly and still be unreachable from the internet if the security group is wrong. AWS security group documentation is worth reading before any production deployment.
Cost is another reason teams like EC2 for early deployments. At the time of writing, AWS lists t3.micro pricing in US East at around $0.0104 per hour for Linux on-demand usage, and AWS also includes 100 GB of monthly data transfer out to the internet across many AWS services and regions. That makes EC2 a practical first hosting option for small apps, MVPs, internal dashboards, and staging environments. AWS EC2 pricing changes by region and instance type, so always check your selected region before deploying.
The point is this: EC2 is not “one-click hosting.” It is a flexible server. That flexibility is powerful when you know the deployment path.
The Solution — The Hitori EC2 Deployment Path
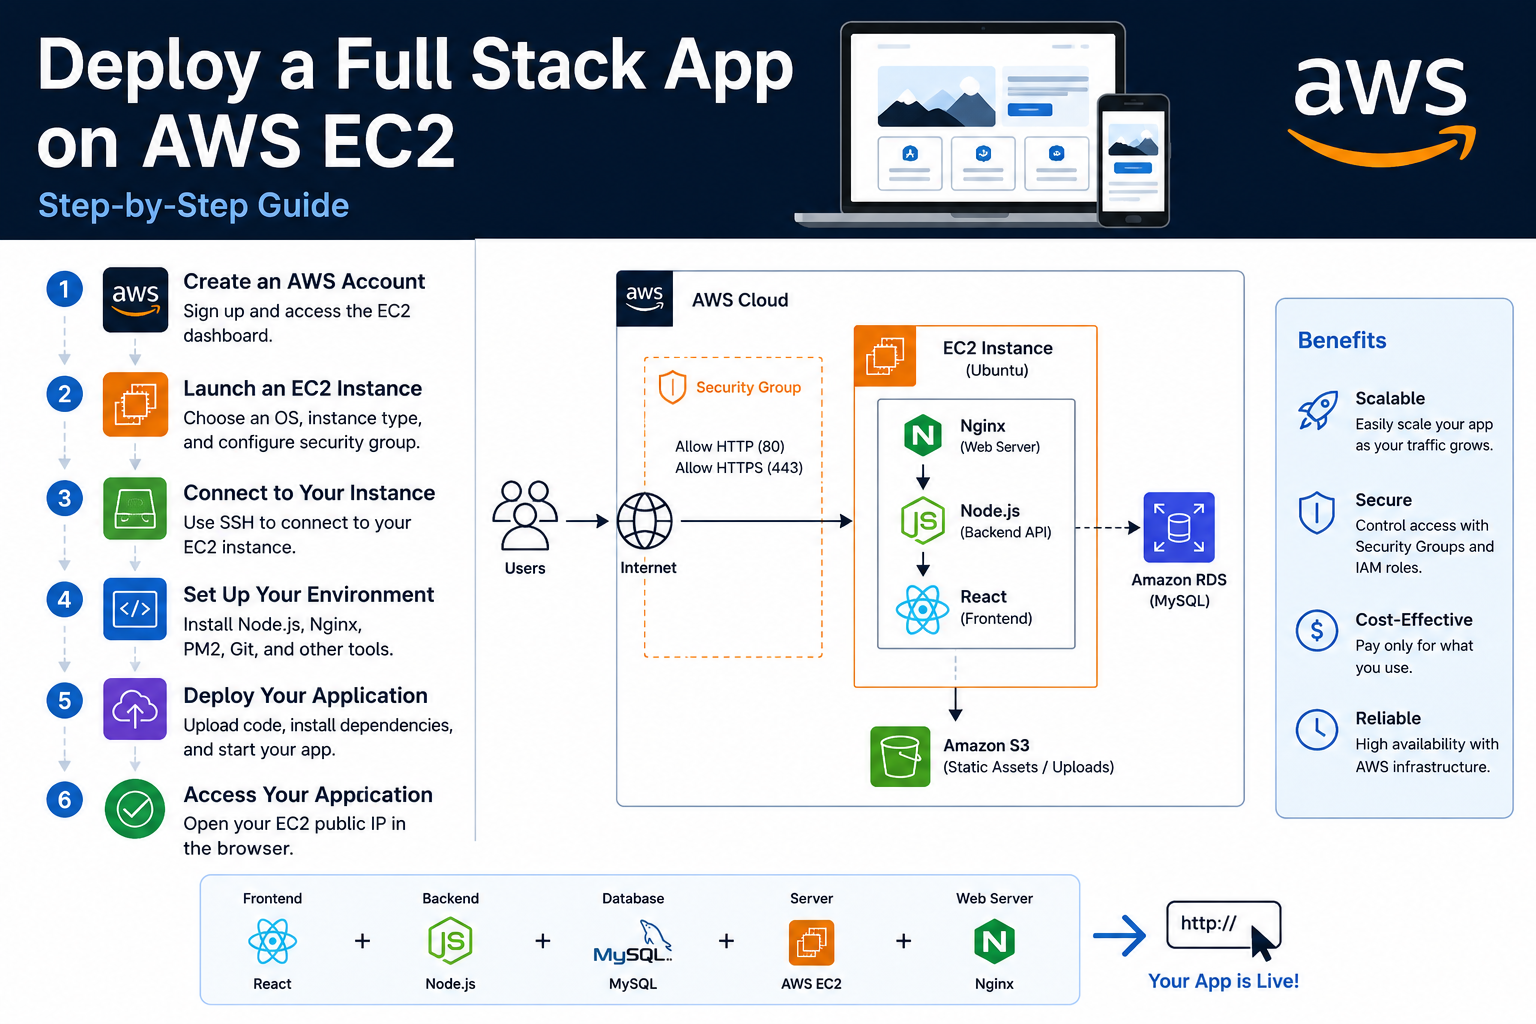
The cleanest way to deploy a full stack app on AWS EC2 is to treat EC2 as a small production server. That means the frontend should be served through Nginx, the backend should run as a managed background process, and public traffic should enter through ports 80 and 443, not through random development ports.
This is the deployment architecture:
User Browser
    ↓
Domain / Public IP
    ↓
Nginx on EC2
    ↓
Frontend static files
    ↓
/api requests reverse proxied to Node.js backend
    ↓
Database or external service
For a simple production setup, Nginx listens on port 80 and 443. Your backend runs privately on something like 127.0.0.1:5000. Users never directly access port 5000. Nginx forwards API traffic to it.
Step 1: Launch an EC2 instance
Start with an Ubuntu LTS EC2 instance. For small apps, a t3.micro, t3.small, or t4g.small is usually enough. Use at least 20 GB of EBS storage if you plan to install dependencies, build frontend assets, store logs, and run updates.
Your EC2 security group should allow:
| Port | Purpose | Source |
|---|---|---|
| 22 | SSH access | Your IP only |
| 80 | HTTP traffic | Anywhere |
| 443 | HTTPS traffic | Anywhere |
| 5000 or app port | Backend app | Do not expose publicly unless testing |
Do not leave SSH open to 0.0.0.0/0 unless you have no other option. Use “My IP” when creating the rule. For production, SSH should be restricted as much as possible.
Connect using SSH. AWS documents the standard SSH method for Linux EC2 instances using your private key, username, and public DNS or IP address. AWS SSH documentation gives the official connection flow.
chmod 400 your-key.pem

ssh -i your-key.pem ubuntu@YOUR_EC2_PUBLIC_IP
For Ubuntu AMIs, the default user is usually:
ubuntu
For Amazon Linux, it is usually:
ec2-user
Step 2: Update the server and install required packages
Once connected, update the server first.
sudo apt update && sudo apt upgrade -y
Install Git, Nginx, Curl, and build tools:
sudo apt install -y git nginx curl build-essential
Install Node.js. For most modern full stack apps, use an LTS version. NodeSource is commonly used for installing Node.js on Ubuntu servers.
curl -fsSL https://deb.nodesource.com/setup_20.x | sudo -E bash -
sudo apt install -y nodejs
Check the versions:
node -v
npm -v
Install PM2 globally:
sudo npm install -g pm2
PM2 is a production process manager for Node.js. It keeps your backend running after SSH disconnects, restarts it if it crashes, and can start it automatically after a server reboot. PM2’s own documentation describes it as a daemon process manager that helps manage and keep applications online. PM2 documentation is useful when you start adding clustering, logs, and startup scripts.
Step 3: Clone your full stack app
Move into a clean deployment directory:
cd /var/www
sudo mkdir fullstack-app
sudo chown -R ubuntu:ubuntu fullstack-app
cd fullstack-app
Clone your project:
git clone https://github.com/your-username/your-repo.git .
A common project structure looks like this:
fullstack-app
├── client
│   ├── package.json
│   └── src
│
└── server
    ├── package.json
    └── src
Some projects use:
frontend
backend
The folder names do not matter. What matters is that the frontend can be built into static files, and the backend can run as a Node.js service.
Step 4: Configure backend environment variables
Go into the backend folder:
cd /var/www/fullstack-app/server
npm install
Create your .env file:
nano .env
Example:
NODE_ENV=production
PORT=5000
DATABASE_URL=your_database_connection_string
JWT_SECRET=use_a_real_secret_here
CLIENT_URL=https://yourdomain.com
Never commit production .env files to GitHub. Use environment variables or secret management for serious production systems. For small EC2 deployments, a protected .env on the server is common, but it should still be handled carefully.
Start the backend with PM2:
pm2 start npm --name fullstack-api -- start
If your backend entry file is server.js, you can also run:
pm2 start server.js --name fullstack-api
Save the PM2 process list:
pm2 save
Enable startup on reboot:
pm2 startup
PM2 will print a command. Copy and run that command exactly.
Check logs:
pm2 logs fullstack-api
At this stage, your backend should be running privately on the server.
Test it locally from EC2:
curl http://localhost:5000
If your API has a health route:
curl http://localhost:5000/api/health
Step 5: Build the frontend
Go into the frontend folder:
cd /var/www/fullstack-app/client
npm install
Set the production API URL correctly. For a Vite React app, you may have:
VITE_API_URL=https://yourdomain.com/api
For Create React App, it may be:
REACT_APP_API_URL=https://yourdomain.com/api
For Next.js, it may be:
NEXT_PUBLIC_API_URL=https://yourdomain.com/api
Build the frontend:
npm run build
For Vite, the output is usually:
dist
For Create React App, the output is usually:
build
For Next.js, deployment depends on whether it is static export or server-rendered. If you are deploying a normal server-rendered Next.js app, you will usually run it with PM2 instead of serving it as only static files. For a simple static export, Nginx can serve the generated output.
For this guide, we’ll assume a frontend build output of:
/var/www/fullstack-app/client/dist
Step 6: Configure Nginx as a reverse proxy
Nginx should serve frontend files and forward API requests to your backend. The official Nginx documentation describes reverse proxying as passing client requests to proxied servers using directives like proxy_pass. Nginx reverse proxy documentation is the best reference for deeper configuration.
Create a new Nginx config:
sudo nano /etc/nginx/sites-available/fullstack-app
Use this configuration:
server {
    listen 80;
    server_name yourdomain.com www.yourdomain.com;

    root /var/www/fullstack-app/client/dist;
    index index.html;

    location / {
        try_files $uri /index.html;
    }

    location /api/ {
        proxy_pass http://127.0.0.1:5000/api/;
        proxy_http_version 1.1;

        proxy_set_header Host $host;
        proxy_set_header X-Real-IP $remote_addr;
        proxy_set_header X-Forwarded-For $proxy_add_x_forwarded_for;
        proxy_set_header X-Forwarded-Proto $scheme;
    }
}
Enable the site:
sudo ln -s /etc/nginx/sites-available/fullstack-app /etc/nginx/sites-enabled/
Remove the default Nginx site if needed:
sudo rm /etc/nginx/sites-enabled/default
Test Nginx:
sudo nginx -t
Restart Nginx:
sudo systemctl restart nginx
Now visit:
http://YOUR_EC2_PUBLIC_IP
If DNS is already connected, visit:
http://yourdomain.com
Step 7: Point your domain to EC2
Go to your DNS provider and create an A record:
| Type | Name | Value |
|---|---|---|
| A | @ | EC2 public IP |
| A | www | EC2 public IP |
If you use Cloudflare, set the records to DNS only first while testing. Once everything works, you can enable proxy mode if needed.
For production, attach an Elastic IP to the EC2 instance. If you use the default public IPv4 address and stop/start the instance, the IP may change. An Elastic IP keeps the address stable.
Step 8: Install HTTPS with Certbot
Install Certbot:
sudo apt install -y certbot python3-certbot-nginx
Run:
sudo certbot --nginx -d yourdomain.com -d www.yourdomain.com
Certbot will update your Nginx config and install SSL certificates. It also sets up renewal automatically on most Ubuntu installations.
Test renewal:
sudo certbot renew --dry-run
Once HTTPS is active, update your backend CLIENT_URL and frontend API URLs to use https://.
Step 9: Add a basic deployment workflow
Manual deployment is fine for the first version. A simple update flow looks like this:
cd /var/www/fullstack-app
git pull
Then update backend:
cd server
npm install
pm2 restart fullstack-api
Then update frontend:
cd ../client
npm install
npm run build
sudo systemctl reload nginx
For teams, this should eventually become a CI/CD pipeline using GitHub Actions, GitLab CI, CodeDeploy, or a custom deployment script. GitHub Actions is a strong fit for small teams because it can SSH into the server, pull the latest code, install dependencies, build the frontend, restart PM2, and reload Nginx. GitHub’s own documentation covers workflow automation and deployment pipelines in detail. GitHub Actions documentation
EC2 vs Other Deployment Options
EC2 is best when you want server control. It is not always the fastest or lowest-maintenance option. A full stack app can also be deployed on platforms like Render, Railway, Fly.io, Vercel, AWS Elastic Beanstalk, ECS, or Kubernetes.
| Option | Best for | Complexity | Control | Typical use case |
|---|---|---|---|---|
| AWS EC2 | Teams that need full server control | Medium | High | MERN/PERN apps, custom Nginx, full backend control |
| Vercel + managed API | Frontend-heavy apps | Low | Medium | Next.js frontend, serverless routes |
| Render/Railway | Fast backend deployment | Low | Medium | MVPs, small APIs, staging apps |
| Elastic Beanstalk | AWS-managed app platform | Medium | Medium | Apps that need AWS but less manual server work |
| ECS/Fargate | Containerized production workloads | High | High | Dockerized apps, scalable services |
| Kubernetes | Complex multi-service systems | Very high | Very high | Large-scale platform engineering |
For a first serious deployment, EC2 is a good learning and production option because it teaches the full chain: Linux, SSH, firewall rules, process management, Nginx, DNS, SSL, and logs.
For a client project where uptime and scaling matter, we usually recommend moving from a single EC2 instance to a more resilient architecture: load balancer, managed database, backups, monitoring, CI/CD, and separate environments for staging and production. That is where a DevOps partner like Hitori Tech can help design the deployment properly instead of just “making it work once.”
Common Mistakes and How to Avoid Them
The most common mistake we see is exposing the backend port directly to the internet. A backend running on 5000, 8000, or 3001 should usually be behind Nginx. Public users should access https://yourdomain.com/api, and Nginx should proxy that internally to the backend.
The second mistake is using localhost in frontend API calls. In production, the browser runs on the user’s machine. If your frontend calls http://localhost:5000, it tries to contact port 5000 on the visitor’s computer, not your EC2 server. Use a production API URL like https://yourdomain.com/api.
The third mistake is forgetting to keep the Node.js app alive. Running npm start over SSH is not enough. The process may stop when the SSH session closes. Use PM2 or a systemd service so the backend survives disconnects, crashes, and reboots.
The fourth mistake is opening SSH to the whole internet. Port 22 should be restricted to your IP whenever possible. For production setups, use a VPN, AWS Systems Manager Session Manager, or strict IP rules.
The fifth mistake is building everything as root. It may seem easier, but it creates permission problems and security risk later. Use a normal Linux user, keep app files owned correctly, and use sudo only where required.
The sixth mistake is not monitoring disk space. Frontend builds, Node modules, logs, Docker images, and old releases can fill a small EC2 disk quickly. Check disk usage regularly:
df -h
Check PM2 logs:
pm2 logs
Check Nginx logs:
sudo tail -f /var/log/nginx/error.log
Real-World Example
A typical startup MVP uses a React frontend, Node.js/Express backend, PostgreSQL database, and a small admin dashboard. Locally, the app runs with frontend on 5173, backend on 5000, and database on a managed provider.
The first EC2 deployment usually fails for three reasons. The frontend still calls localhost, the backend is started manually without PM2, and the security group allows port 5000 publicly but forgets HTTPS. That setup works for testing but is not clean production deployment.
The better setup is to run the backend on 127.0.0.1:5000, build the frontend into /var/www/app/client/dist, serve static files through Nginx, proxy /api to the backend, and install SSL with Certbot. The public surface becomes only ports 80 and 443, while SSH is restricted to the developer’s IP.
In one small deployment pattern we use for MVPs, the total live setup can be completed in under two hours once the codebase is ready. The production structure is simple enough for a founder to understand, but stable enough to run a real app: PM2 handles the Node process, Nginx handles traffic, Certbot handles SSL, and GitHub Actions can later automate releases.
For businesses that want this connected to automated workflows, error reporting, lead capture, email alerts, or admin operations, Hitori Tech’s N8N automation services can connect the deployed app with tools like Slack, Gmail, Google Sheets, CRMs, payment systems, and internal dashboards.
Full EC2 Deployment Checklist
A full stack EC2 deployment is ready when every part of the chain is tested. Use this checklist before sending the live URL to users.
| Area | Check |
|---|---|
| EC2 | Instance running with correct region, size, and storage |
| Security group | SSH restricted, HTTP and HTTPS open |
| DNS | Domain A records point to EC2 Elastic IP |
| Backend | Runs with PM2 and restarts after reboot |
| Frontend | Production build served by Nginx |
| Nginx | nginx -t passes and reverse proxy works |
| SSL | Certbot certificate installed and renewal tested |
| Environment | Production .env values are correct |
| Logs | PM2 and Nginx logs checked |
| Database | Production database connection tested |
| Firewall | No unnecessary public app ports exposed |
| Backups | Database and important files have a backup plan |
If the app passes this checklist, you have a clean baseline deployment.
Frequently Asked Questions
What is the best way to deploy a full stack app on AWS EC2?
The best way to deploy a full stack app on AWS EC2 is to use Nginx as the public web server, PM2 as the Node.js process manager, and HTTPS through Certbot. The frontend should be built into static files and served by Nginx, while API requests should be reverse proxied to the backend running privately on localhost.
How do I deploy a React and Node.js app on EC2?
Deploy a React and Node.js app on EC2 by launching an Ubuntu instance, installing Node.js, Nginx, Git, and PM2, cloning your repository, building the React frontend, running the Node backend with PM2, and configuring Nginx to serve the frontend and proxy /api requests to the backend. After that, point your domain to EC2 and install SSL.
Why does my EC2 app work locally but not online?
Your EC2 app usually works locally but not online because production URLs, ports, firewalls, or environment variables are wrong. The most common issue is a frontend still calling localhost for API requests. Other common causes include closed security group ports, missing Nginx proxy rules, backend crashes, or incorrect .env values.
Which ports should I open for a full stack app on EC2?
For a normal full stack app on EC2, open port 22 only to your IP, port 80 to the internet, and port 443 to the internet. Do not publicly expose backend ports like 5000, 8000, or 3001 unless you are doing temporary testing. Nginx should forward public traffic to the backend internally.
Can I deploy a Next.js app on AWS EC2?
You can deploy a Next.js app on AWS EC2, but the setup depends on whether it is static or server-rendered. A static export can be served through Nginx like a normal frontend build. A server-rendered Next.js app should run as a Node.js process with PM2, usually behind Nginx as a reverse proxy.
Is AWS EC2 good for production full stack apps?
AWS EC2 is good for production full stack apps when it is configured properly with Nginx, SSL, process management, backups, monitoring, and restricted security groups. A single EC2 instance is fine for small apps, MVPs, internal tools, and early production workloads. For larger systems, use a load balancer, managed database, CI/CD pipeline, monitoring, and autoscaling.
Deploying a full stack app on AWS EC2 is not difficult once the architecture is clear. Keep the backend private, let Nginx handle public traffic, use PM2 for process reliability, secure the site with HTTPS, and avoid exposing unnecessary ports. If you want this set up properly for a client project, SaaS product, MVP, or internal business tool, you can explore Hitori Tech’s services or contact us for a production-ready deployment plan.